

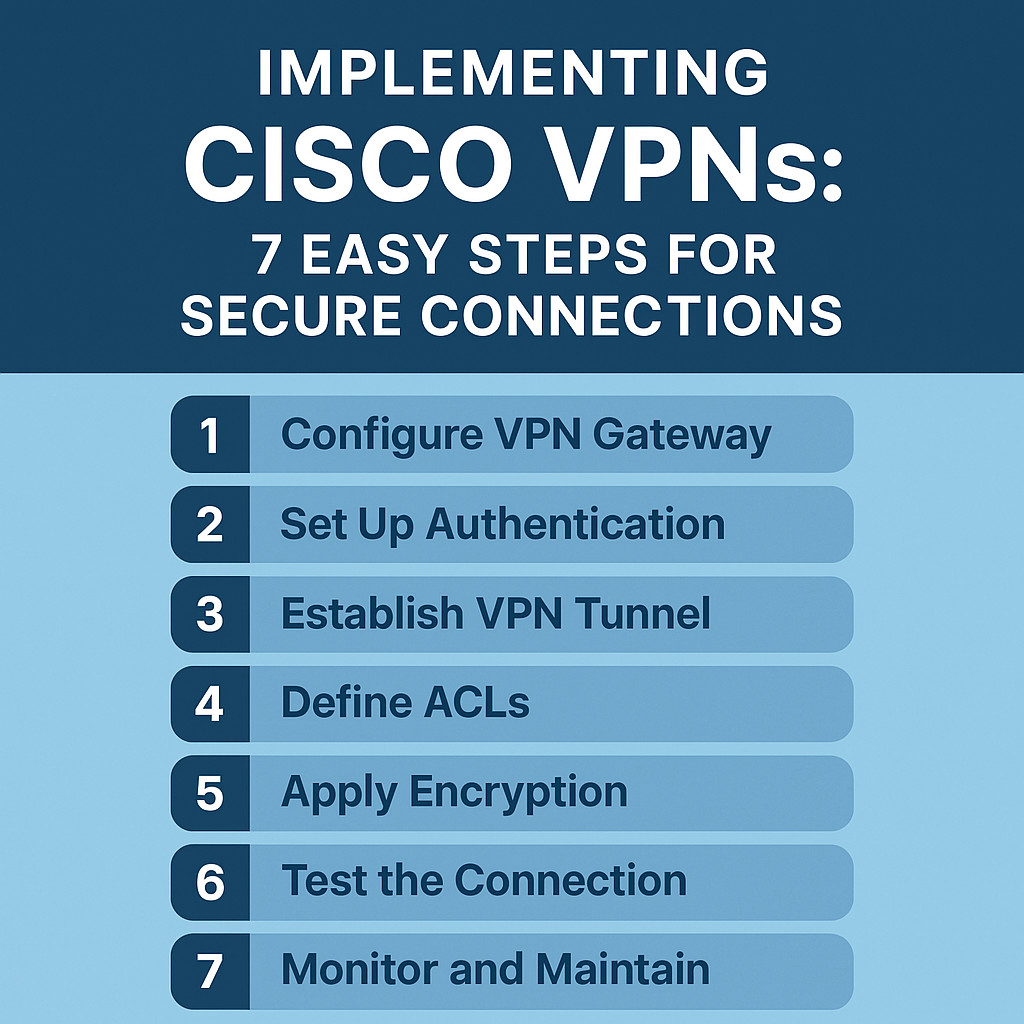
Implementing Cisco VPNs: 7 Easy Steps for Secure Connections
Implementing Cisco VPNs has become essential for organizations looking to secure their network connections in today’s increasingly digital workplace. With cyber threats growing more sophisticated each day, businesses need reliable, industry-standard solutions that offer both security and flexibility. Did you know that VPN usage increased by over 27% during the global shift to remote work in 2020? This trend continues as hybrid work models become the norm rather than the exception. Cisco VPNs stand out in the crowded security landscape because they combine enterprise-grade protection with straightforward deployment options that IT teams of any size can manage. Unlike many competing solutions, Cisco’s VPN technology integrates seamlessly with existing network infrastructure, creating a unified security posture rather than fragmented protection. Whether you’re upgrading your current security systems or implementing a VPN for the first time, this guide will walk you through everything you need to know to create secure, reliable connections for your business in just seven simple steps.
Table of Contents
What is Implementing Cisco VPNs?
Ever wondered how large enterprises maintain secure communications across multiple locations without breaking a sweat? Implementing Cisco VPNs is like building an invisible, fortified tunnel between different parts of your network. Remember trying to share sensitive information through email and worrying if it would fall into the wrong hands? Those days can be behind you! Cisco VPNs create encrypted pathways that keep your data safe from prying eyes as it travels across the public internet. As the old saying goes, “better safe than sorry” – especially when it comes to your organization’s critical data! Whether you’re connecting remote employees to your main office or linking multiple business locations into one cohesive network, mastering Cisco VPNs will revolutionize how your business handles secure communications. Ready to join the ranks of network security pros? Let’s dive in!
| Product Information | Details |
|---|---|
| To learn more, click on the link Follow the link to learn more | |
| Implementing Cisco VPNs | |
| Product details | |
| Publisher | McGraw-Hill/Osborne Media |
| Languages | English |
| ISBN | 0072130482 |
| Item ID | VG470733 |
| Origin | United States |
| Store Information | |
| Business Name | JUN BAI TRADING CO.,LIMITED |
| Address | Room 616, 6th Floor, Kam Tim Industrial Building, 135 Connaught Road West, Western District, Hong Kong Central and Western District 999077 Hong Kong Special Administrative Region, Hong Kong Island China |
| Note | If you have any inquiries, you may contact this store through the direct chat function. |
A practical guide to putting into practice will demonstrate the process of setting up virtual private networks based on Cisco in a detailed manner. It offers an in-depth look at different VPN technologies, comparing and explaining the functionality of each one.
Why You’ll Love Implementing Cisco VPNs:
Implementing Cisco VPNs transforms your organization’s network security posture with industry-leading encryption technology that creates virtually impenetrable connections. The standout feature of Cisco’s VPN solutions is their remarkable integration capabilities with existing Cisco infrastructure, creating a unified security environment rather than requiring separate management systems.
From a financial perspective, the long-term savings are substantial when compared to subscription-based third-party VPN providers. While the initial investment might seem higher, organizations typically recoup these costs within 12-18 months through eliminated monthly fees. For enterprises with hundreds of users, this represents tens of thousands in annual savings while maintaining complete control over your security infrastructure.
What truly sets Cisco VPNs apart is their advanced security architecture featuring next-generation encryption protocols, comprehensive authentication options, and granular access controls. Unlike generic VPN solutions, Cisco’s implementation allows for highly customized security policies that can adapt to specific organizational requirements and compliance frameworks. This pairs perfectly with Cisco’s Firepower Threat Defense system, which many of our readers have successfully deployed for additional network protection layers.
Ready to transform your network security? Let’s explore how to implement these powerful Cisco VPN solutions step by step.
How to Implement Cisco VPNs: Quick Overview
Implementing Cisco VPNs offers an exceptional balance of enterprise-grade security and deployment simplicity. What makes these solutions particularly powerful is their scalability – the same fundamental configuration principles apply whether you’re securing a small business network or an international enterprise with thousands of endpoints. Cisco VPNs stand out for their implementation of AnyConnect Secure Mobility Client, which provides seamless connectivity across devices and platforms without compromising security.
The typical setup time ranges from 2-3 hours for basic implementations to 1-2 days for complex enterprise configurations with multiple security domains. Even for IT professionals with moderate Cisco experience, the intuitive CLI and well-documented procedures make implementation straightforward, particularly when following our seven-step approach.
Key Requirements for Implementing Cisco VPNs:
Before diving into the implementation process, ensure you have all the necessary components ready:
Hardware Requirements:
- Cisco ASA 5500-X Series firewall or Cisco ISR router with Security license
- Minimum of 8GB RAM for optimal performance
- Adequate storage (16GB minimum recommended)
- Stable internet connection with static IP address
- Backup power solutions (UPS recommended)
Software Requirements:
- Cisco ASA software version 9.1 or higher (9.8+ recommended for latest features)
- Cisco AnyConnect Secure Mobility Client licenses (quantity based on concurrent users)
- Valid SSL certificates (self-signed or from certificate authority)
- Cisco ASDM (Adaptive Security Device Manager) for GUI-based management
Network Prerequisites:
- Defined IP addressing scheme for VPN pool
- NAT configurations identified and documented
- Firewall rules permitting VPN protocols (UDP 500, ESP IP Protocol 50)
- DNS servers configured and accessible
- Authentication infrastructure (local, RADIUS, or LDAP)
Step-by-Step Instructions for Implementing Cisco VPNs:
Step 1: Planning Your Cisco VPN Implementation
Before touching any equipment, document your VPN requirements:
- Identify which locations need to be connected
- Determine the number of simultaneous users expected
- Map out your IP addressing scheme for VPN clients
- Establish authentication methods (local accounts vs. external authentication services)
- Define which resources VPN users will access
- Document security policies and access controls
This planning phase prevents configuration issues later and ensures your Cisco VPN implementation meets all organizational requirements.
Step 2: Configure Basic ASA Settings
- Connect to your Cisco ASA via console cable
- Enter configuration mode:
enablefollowed byconfigure terminal - Set hostname:
hostname YourASAName - Configure interfaces with appropriate IP addresses:
interface GigabitEthernet0/0nameif outsidesecurity-level 0ip address OUTSIDE_IP SUBNET_MASKno shutdowninterface GigabitEthernet0/1nameif insidesecurity-level 100ip address INSIDE_IP SUBNET_MASKno shutdown - Configure default route:
route outside 0.0.0.0 0.0.0.0 GATEWAY_IP - Set up DNS:
dns domain-lookup outsideanddns server-group DefaultDNS name-server YOUR_DNS_SERVER
Step 3: Implementing Cisco VPNs – Certificate Configuration
Secure VPN connections require proper certificate implementation:
- Generate a self-signed certificate or import a trusted certificate:
crypto key generate rsa label YourKeyName modulus 2048crypto ca trustpoint YourTrustpointenrollment selfsubject-name CN=YourVPNAddresskeypair YourKeyNamecrl configure - For self-signed certificate, complete enrollment:
crypto ca enroll YourTrustpoint noconfirm - For trusted certificates, generate a CSR and import the signed certificate when received
Step 4: Configure VPN Group Policies and Connection Profiles
- Create a group policy:
group-policy GroupPolicy1 internal group-policy GroupPolicy1 attributes dns-server value PRIMARY_DNS SECONDARY_DNS vpn-tunnel-protocol ssl-client split-tunnel-policy tunnelspecified split-tunnel-network-list value SplitTunnelACL - Configure connection profile:
tunnel-group YourVPNName type remote-access tunnel-group YourVPNName general-attributes default-group-policy GroupPolicy1 tunnel-group YourVPNName webvpn-attributes group-alias YourVPNName enable
| Product | Description |
|---|---|
| Follow the link to learn more | OURLIFE 1200Mbps WiFi Repeater, Dual Band Wireless Amplifier, 2.4G 5GHz, Long Range Signal Booster, with Power Supply, US Plug, 110V-130V, for Home Office |
| Follow the link to learn more | Ourlife 1200Mbps Dual-Band WiFi Signal Booster, Wireless Network Amplifier with Ethernet Port, Long Range Coverage Over 5000 sq ft, US Plug, Compatible with Alexa – Power Supply Operated, Non-Waterproof |
| Follow the link to learn more | High-Speed 300Mbps WiFi Repeater Extender – Long Range Wireless Signal Booster, 802.11N Compatible, Easy Setup with WPS Button, US Plug, Indoor/Outdoor Use, White & Black Design, Wifi Extender |
| Follow the link to learn more | [WiFi Signal Booster] 300Mbps Remote Wireless Relay Access Point – WiFi Signal Booster |
| Follow the link to learn more | WAVLINK AC1200 Dual Band Wireless Router – 5GHz 867Mbps& 2.4GHz 300Mbps WiFi, Long Range Coverage, Supports Router/Access Point/Repeater Modes, Ideal for Home & Office, Includes Power Adapter & Ethernet Cable, Office ConnectivityMinimalist Tech GearVisible Branding |
Step 5: Implementing Cisco VPNs – AnyConnect Configuration
- Enable WebVPN on the outside interface:
webvpn enable outside anyconnect image disk0:/anyconnect-win-4.9.00086-webdeploy-k9.pkg anyconnect enable tunnel-group-list enable - Configure split tunneling access list if needed:
access-list SplitTunnelACL standard permit 192.168.1.0 255.255.255.0
Step 6: Configure Authentication Methods
For local authentication:
username admin password YourStrongPassword
aaa authentication ssh console LOCAL
aaa authentication http console LOCAL
For RADIUS/LDAP integration:
aaa-server RADIUSServer protocol radius
aaa-server RADIUSServer (inside) host 192.168.1.100
 key YourSharedSecret
tunnel-group YourVPNName general-attributes
 authentication-server-group RADIUSServer
Step 7: Implementing Cisco VPNs – Testing and Verification
Once configuration is complete:
- Test connectivity from a client machine by navigating to https://YOUR_ASA_PUBLIC_IP
- Download and install the AnyConnect client when prompted
- Connect using the credentials configured
- Verify split tunneling is working by checking route tables on client
- Test access to internal resources
- Monitor ASA logs for connection status:
show vpn-sessiondb detail anyconnect
Temu Promotional Schedule
Don’t miss out on these special promotions while implementing your Cisco VPN solution:
| Promotion | Link |
|---|---|
| Rookie Mission | Follow the link to learn more |
| $10,000 Ranking Race | Follow the link to learn more |
| $3,000 Referral Race | Follow the link to learn more |
| $100 Coupon Bundle | Follow the link to learn more |
| $100 Coupon Bundle | Follow the link to learn more |
| Free Gifts | Follow the link to learn more |
| Free Gifts | Follow the link to learn more |
| Exclusive Deal | Follow the link to learn more |
| Exclusive Deal | Follow the link to learn more |
| Save Big | Follow the link to learn more |
| $2 Cash | Follow the link to learn more |
What to Pair Cisco VPNs With:
To maximize your network security and performance when implementing Cisco VPNs, consider integrating these complementary solutions:
Cisco ASA with FirePOWER Services: Enhance your VPN gateway with next-generation intrusion prevention capabilities that protect VPN traffic from advanced threats. This integration provides visibility into encrypted VPN sessions without compromising privacy.
Cisco AnyConnect Secure Mobility Client with Posture Assessment: Extend your VPN security by checking endpoint compliance before allowing connections. This ensures only devices meeting your security requirements can access your network.
Cisco Umbrella: Add DNS-layer security to your VPN implementation to block malicious destinations before connections are established. This creates a powerful first line of defense for remote users.
Cisco Duo MFA Integration: Strengthen VPN authentication with multi-factor authentication that’s seamlessly integrated into the login process. This dramatically reduces the risk of credential-based attacks against your VPN.
Cisco Identity Services Engine (ISE): Implement context-aware access control policies that adapt based on user, device, location, and behavior patterns. This allows granular control over resources accessed through your VPN connections.
Top Tips for Perfecting Cisco VPN Implementation:
Optimize Split Tunneling Configurations Fine-tune your split tunneling policies to balance security with performance. Instead of sending all traffic through the VPN, carefully define which specific subnets should be routed through the secure tunnel. This reduces VPN bandwidth consumption while maintaining security for critical resources.
access-list SplitTunnelACL extended permit ip any 10.0.0.0 255.0.0.0
access-list SplitTunnelACL extended permit ip any 172.16.0.0 255.240.0.0
access-list SplitTunnelACL extended permit ip any 192.168.0.0 255.255.0.0
Implement Address Pool Conservation Configure your VPN address pools efficiently by using DHCP for address assignment or implementing address pooling with shortest-subnet-first allocation:
ip local pool VPNPool 192.168.100.1-192.168.100.254 mask 255.255.255.0
dhcp-network-scope 192.168.100.0
Enable Dead Peer Detection Prevent hanging VPN sessions with dead peer detection, which automatically detects failed connections and cleans up resources:
tunnel-group YourVPNName ipsec-attributes
 isakmp keepalive threshold 10 retry 2
Configure Timeout Values Appropriately Balance security with user experience by setting reasonable timeout values:
group-policy GroupPolicy1 attributes
 vpn-idle-timeout 30
 vpn-session-timeout 480
Implement Certificate Authentication Move beyond basic password authentication for improved security:
tunnel-group YourVPNName webvpn-attributes
 authentication certificate
Regularly Update ASA Software Keep your ASA firmware current to protect against known vulnerabilities. Schedule regular maintenance windows for updates.
Storing and Maintaining Cisco VPN Configurations:
Proper management of your Cisco VPN configurations ensures ongoing security and availability. Implement these best practices:
Regular Configuration Backups Schedule automated TFTP backups of your complete configuration:
backup-config notifier
 schedule weekly day friday time 23:00
 protocol tftp
 server 192.168.1.100 /backup
 path /ciscobackups/
For enhanced security, implement encrypted backups using SCP:
copy running-config scp://[email protected]//backups/asa-config-$(date +%Y%m%d).txt
Version Control Implementation Maintain a documented history of configuration changes:
- Implement a naming convention that includes date and change purpose
- Store configurations in a Git repository for detailed change tracking
- Require comments for each configuration change
- Implement configuration comparison tools to identify differences between versions
Monitoring and Troubleshooting Set up proactive monitoring with these essential commands:
show vpn-sessiondb summary
show crypto isakmp sa
show crypto ipsec sa
debug crypto condition peer 10.10.10.10
Configure remote logging to a SIEM solution:
logging enable
logging timestamp
logging trap notifications
logging host inside 192.168.1.100
Regular Security Audits Schedule quarterly reviews of your VPN configuration to ensure:
- Removal of unused access rules
- Verification of current encryption standards
- Validation of certificate expiration dates
- Assessment of authentication methods
- Review of access logs for unusual patterns
By following these comprehensive steps and maintenance practices, your Cisco VPN implementation will provide secure, reliable connections for your organization for years to come.
Frequently Asked Questions About Implementing Cisco VPNs
Q: Can you provide a cisco ipsec vpn configuration step by step guide for beginners?
A: Absolutely! For beginners implementing Cisco IPsec VPNs, follow these simplified steps: First, configure your interfaces and routing. Next, create an ISAKMP policy defining encryption and authentication methods. Then, configure IPsec transform sets and crypto maps. Apply the crypto map to your outside interface, create necessary access lists, and test your connection. Our step-by-step guide above provides more detailed commands for each stage of the process.
Q: What’s the difference between cisco ipsec vpn configuration ikev2 and older IKEv1?
A: When implementing Cisco VPNs, choosing IKEv2 offers several advantages over IKEv1. IKEv2 provides improved performance through fewer message exchanges during initial setup, better reliability with built-in keepalive functionality, stronger security with Elliptic Curve Cryptography support, and improved NAT traversal capabilities. While IKEv1 is still supported, we recommend implementing IKEv2 for all new Cisco VPN deployments for these enhanced capabilities.
Q: How does implementing and administering cisco solutions differ for VPNs compared to other network services?
A: Implementing and administering Cisco VPN solutions requires a more security-focused approach than other networking services. You’ll need deeper understanding of encryption technologies, certificate management, authentication methods, and tunneling protocols. Additionally, VPN administration involves more ongoing tasks like monitoring connection statistics, updating security policies, and ensuring endpoint compliance. However, the core Cisco command structure and management interfaces remain consistent across their solution portfolio.
Q: Is it possible to implement vpn in cisco packet tracer for educational purposes?
A: Yes, you can implement basic VPN concepts in Cisco Packet Tracer, but with limitations. Packet Tracer supports configuring site-to-site IPsec VPNs with pre-shared keys for educational purposes. However, it doesn’t fully support advanced features like AnyConnect SSL VPNs, detailed encryption options, or certificate-based authentication. For comprehensive learning, we recommend supplementing Packet Tracer simulations with GNS3 or actual Cisco equipment when implementing Cisco VPNs.
Q: What security considerations should I keep in mind when configuring vpn cisco packet communications?
A: When implementing Cisco VPNs, security should be your primary concern. Always use strong encryption algorithms (AES-256 recommended), implement perfect forward secrecy, use certificates rather than pre-shared keys when possible, enable dead peer detection, implement multi-factor authentication, and regularly audit VPN access logs. Additionally, consider implementing split tunneling carefully, as improper configuration can create security vulnerabilities, potentially exposing your network to attacks.